Tutorials
Training an AI model
In this tutorial, you will learn how to train an AI model using the mpVision UI.
After logging in to the application, you will be able to upload your images, label them, and train your AI model. The trained model can then be used for real-time processing in a lab or a commercial production floor.
Creating a dataset
In order to train an AI model, you need to create a dataset. A dataset is a collection of images that are used to teach the AI model what you need it to detect. You can create a dataset by uploading images from your computer or by using the mpVision API to connect to an imaging device.
In this tutorial, we will be using the blood cell count and detection dataset (BCCD) that can be downloaded from Kaggle. Click on the link and download it to your local machine.
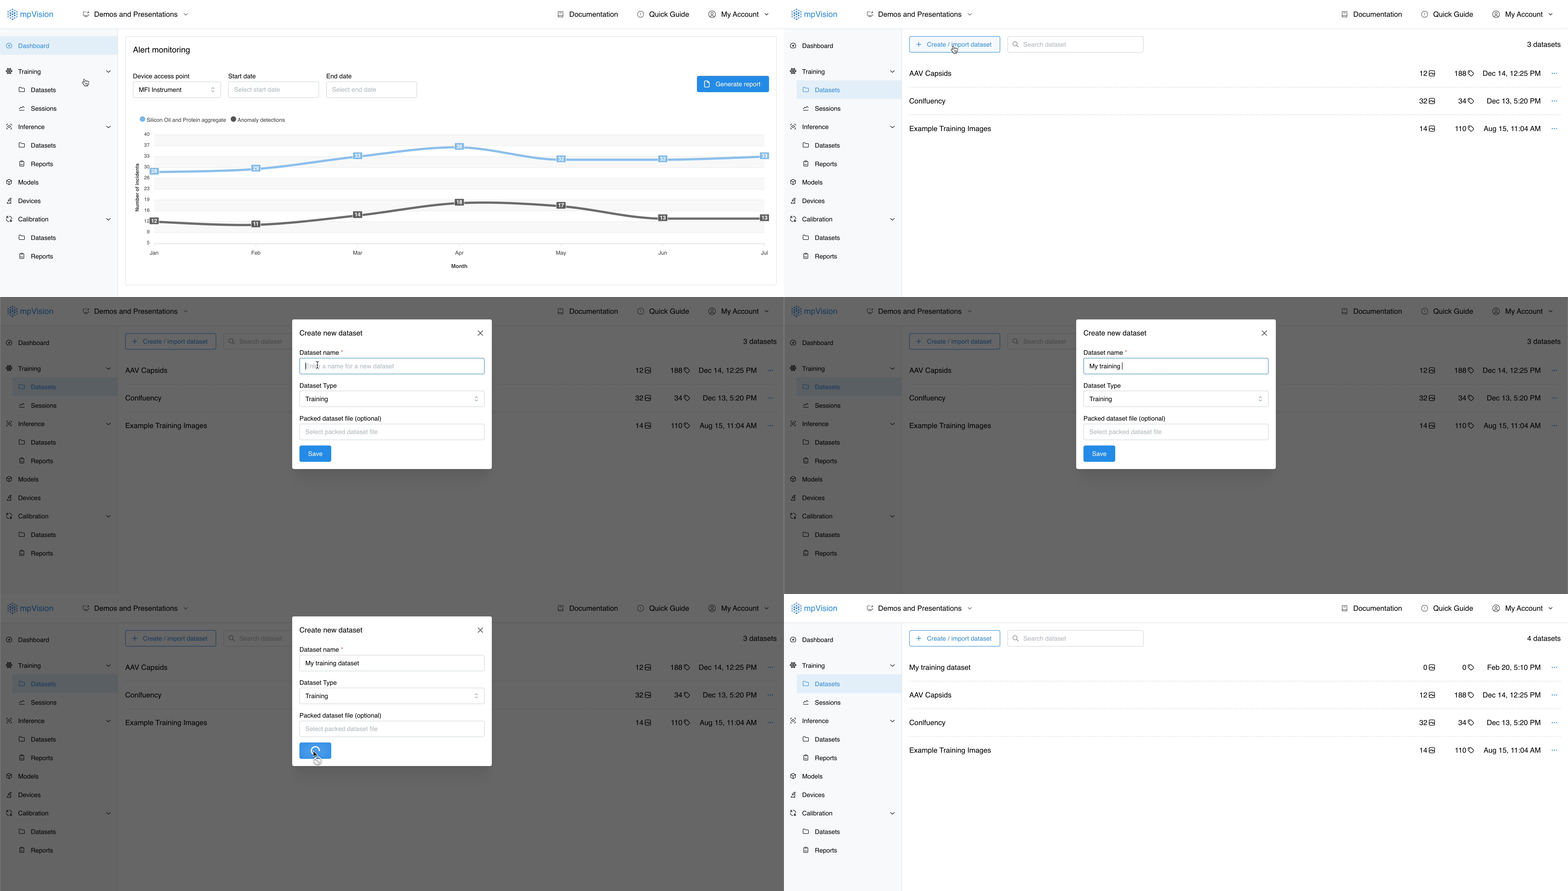
To create a dataset, click on the Datasets tab in the left-hand navigation under the Training section, and then click on the Create dataset button in top left corner. You will be prompted to input dataset title. For consistency with this tutorial, you can name it "BCCD Tutorial", but feel free to choose any name that you find suitable. When finished, click Save, and the dataset with provided name will appear in the list in the centered on the application screen.
Uploading images
After creating a dataset, you can upload images to it. To upload images, click on the dataset that you just have created. You will see that the dataset is currently empty. In the center of the screen, a dropzone for files will be shown. You can drag images directly from you desktop file browser or click on the Upload images button in the top right corner of the dataset page. That will open a file picker where you can select images from your computer. After selecting the images, upload process will start, and you will be able to see the progress of the upload in the bottom right corner.
After the upload is complete, you can proceed to the next step — labeling the content of the images.
Labeling the dataset
The BCCD dataset we have uploaded contains images of two types of blood cells: white blood cells and red blood cells. In addition, there are images of platelets (also known as thrombocytes). To train an AI model to detect these objects, we need to label them in the images — an AI model will be training to both detect and classify them into one of the three classes.
To train the AI, we will need to first annotate 20 images. We will use the rest of the images to test the model in the next step. To start labeling, click on any image in the dataset, and you will be taken to the image labeling screen. The labeling screen consists of two parts: the image itself and the right-hand side panel along with the list of assigned labels (it will be empty in the beginning). In addition, the autodetection tools in the right-hand side panel will help speed up the labeling process.
You can assign labels to objects in the image by drawing polygons around them. To start drawing a polygon, click on the area where you want to put first point of the polygon. Then move the mouse to the next point and click again. Continue this process until you have drawn a polygon around the object. When you are done, hit enter on you keyboard and you will see the label name input popover. We have used three labels in this tutorial: "RBC" for red blood cell, "WBC" for white blood cell, and "Platelets" — they are easy to identify — WBC are blue, RBC are red, and Platelets are purple. After inputting the label name, select "Create" button below the label name input. You will see that the label is added to the list of labels and autoselected for this polygon. You can continue drawing polygons around the objects in the image and assigning labels to them.
Drawing every polygon can be time-consuming, so we have provided a tool that can help you to speed up the process. The controls for this tool are located in the right-hand side panel. To start the autodetection process, click on the select input field located under "Autodetection algorithm" label - by default it is set to "None". You can select one of the available algorithms from the dropdown list. For this dataset, the most suitable algorithm is "SAM" (Segment Anything Model). You can learn more about different autodetection algorithms in the Autodetection algorithms section of the user manual.
After selecting the algorithm, you will see a loading indicator on the top left corner of the image. When the autodetection process is complete, you will see the polygons drawn around the objects in the image. Click on any generated contour, adjust it if needed by dragging the points, and assign the label to it.
To train a model, you can use the Autolabeler to help fully label (no missed objects) about 20 images. For this exercise, we have already annotated 20 images for you. mpVision supports packaging and importing annotated datasets. You can download the annotated dataset from here. To learn more about different type of supported formats for importing datasets, please refer to the Importing datasets section of the user manual.
After downloadin the file, return to the training datasets view (click on the Datasets tab in the left-hand navigation under the Training section), and click on the Create/Import dataset button in the top left corner. You will be prompted to input a dataset title. For consistency, you can name it "BCCD Tutorial Imported Dataset" and select the input below — it will open an upload window where you can select the downloaded file. When done, click Save, and the dataset with your provided name will appear in the list centered on the application screen. Your internet speed will determine the data import speed.
After the upload is complete, you will see that all the images in this dataset are annotated. You can proceed to the next step — starting the training process.
Initiating training process
To start the training process, go to the dataset details page that contains images gallery of your uploaded dataset. Click the start training button in the top left corner of the view. Upon clicking on that button, you will see "Training started" message at the bottom right corner of the screen. The training process usually takes up to six hours, depending on the size of the dataset and the complexity of the objects that you are training the model to detect. You can check the status of the training session by clicking on the "Training Sessions" tab on the left side of "Start Training" button. The popover with the list of active training sessions using this dataset will appear ( currently should show only one session).
You can see the status right next to the session identificator — it will show "In progress" for our dataset now. When training is complete, the status will change to "Done", and instead of the "Stop" button, you will see "View" button. Click on it to see the results of the training.
But do not worry, you do not have to wait for the full six hours for results — our default models are very efficient with this datase, so it should take only about 10 minutes to achieve good results. You can therefore already check the results of the training session in progress after 10 minutes. The "Stop" button will change to "View", and you can click on it to see the results in progress of the training session. It will take you to the training session page where you can see the training progress details. These details contain a training metrics chart with loss and accuracy values, and the list of validation images are included with the bounding boxes drawn around the objects the model has detected.
The training chart shows 3 values that are used to evaluate the model performance: training loss, accuracy, and mean average precision (mAP). The training loss is a value that shows how well the model is learning the data. The accuracy is a value that shows how well the model is predicting the data on validation images that you can see below the chart. The mAP is a value that shows how well the model is detecting the objects in the images. The higher the mAP value, the better the model is at detecting the objects in the images. You can learn more about these values in the Training metrics section of the user manual.
For now, select the third training step directly on the chart, and click the "Export model version" button on the top right corner (see the video above for more details). You will be prompted to input the model name that will be used to identify this model in your model library. For consistency, you can name it "BCCD Tutorial Model". When finished, click Save, and the model with the provided name will appear in the list of models in the model library.
That's it! You have successfully trained an AI model using the mpVision UI. Now we can go further and test the model on the images that were not used for training. It is very important to validate your model and make sure it performs consistently — we do not want to have surprise false positives or false negatives in the real-world application. FOr our GxP environment, we want to have a model that is reliable, accurate, and consistent in its predictions. To learn more about testing the model, please move to the next tutorial — Validating generated model.